

Damp in homes is one of the most common problems in houses, flats, premises and old buildings. Sometimes they appear as a small stain on a wall, as paint that peels off, as mold in a corner of the bathroom or as saltpeter in the lower part of a wall. At first it may seem like an aesthetic problem, but behind that sign there can be very different causes.
Not all dampness has the same origin. A stain on the ceiling after several days of rain is not treated the same as the black mold that appears in an unventilated bathroom. A wall that chipped from the skirting board is not the same as a punctual condensation on a window during the winter.
Therefore, before applying a paint, mortar, waterproofing or any decorative coating, it is essential to ask yourself a first question:
Where does moisture really come from?
This question is key because many common solutions to humidity are based on covering, blocking or waterproofing the affected surface. In some cases, these solutions can be useful if they are part of a well-thought-out system. But when applied without understanding the source of the problem, they can hide moisture for a while, move it to another area or even worsen the behavior of the wall.
In bioconstruction, the approach is usually more prudent: first understand the cause, then resolve the source of the water or excess steam, and finally choose materials that are compatible with the substrate. In many cases, this involves working with mineral, breathable and natural solutions, which allow the enclosures to better manage moisture when necessary.
This guide was created precisely with this objective: to help you understand the main types of damp in homes, recognise their most common signs and find out what solutions exist for each case. We will talk about condensation damp, mould stains in bathrooms, capillarity, leaks and leaks, also explaining the most frequent mistakes and the healthiest alternatives to improve indoor comfort.
The main idea to keep in mind from the beginning is simple:
There is no single solution for all dampness. Before treating a wall, you need to understand what kind of moisture we have and where it comes from.
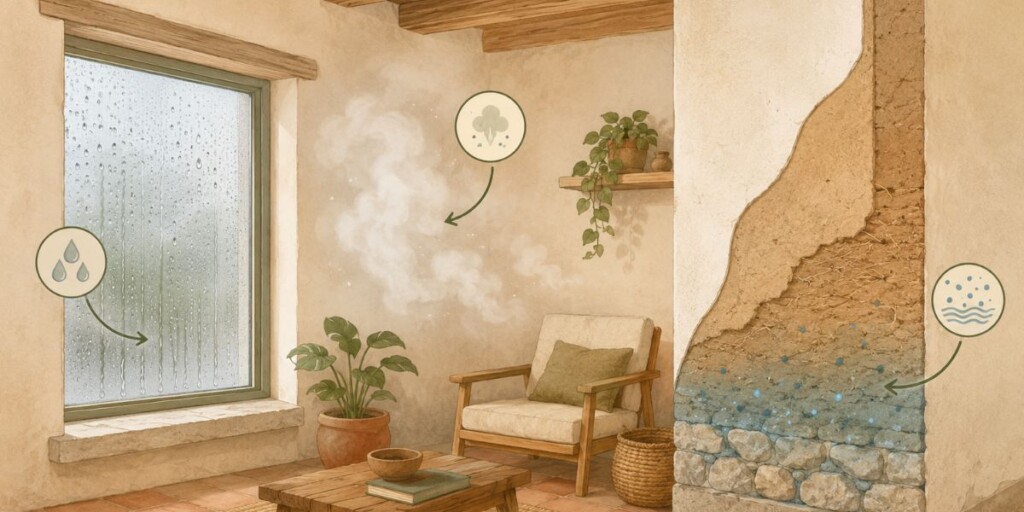
When we talk about humidity in a home, we refer to the presence of water or water vapour in a greater amount than the environment, materials or enclosures can manage in a balanced way.
Moisture can be in the air inside, on a wall, on a ceiling, on the floor, on an old wall or even hidden inside a construction element. Sometimes it is clearly seen, like a stain or chip. Other times it is perceived earlier by its effects: smell of closure, a feeling of cold, condensation on the windows or the appearance of mold in specific areas.
It is important to understand that moisture does not always present itself in the same way. It can appear as liquid water, as ambient vapor, as condensation on a cold surface, or as moisture retained within materials. For this reason, the same wall can be affected by very different causes, although at first glance they all appear as a stain.
In a home we can mainly find three forms of humidity:
Ambient humidity: is the amount of water vapour present in the indoor air. It increases with daily activities such as showering, cooking, hanging clothes inside the house or not ventilating properly.
Moisture in materials: appears when a wall, ceiling, floor, or wall absorbs or retains water. It can be due to leaks, capillarity, leaks or an accumulation of moisture that does not evaporate properly.
Condensation: This occurs when water vapor in the air comes into contact with a cold surface and turns into water droplets. It is common in windows, mirrors, corners, bathroom ceilings or poorly ventilated walls.
This difference is fundamental because a home with excess ambient humidity is not solved in the same way as a wall affected by capillarity or a wall with active filtration. In the first case, it may be necessary to improve ventilation, reduce steam production or use materials that help regulate indoor humidity. In the second, the origin of the water and the compatibility of the substrate will have to be studied before applying any finish.
In addition, the construction materials themselves influence the way a home manages humidity. Some materials allow water vapor to pass through and help the enclosures to dry better. Others, on the other hand, form more closed or impermeable layers that can hinder evaporation if applied to wet or poorly diagnosed substrates.
Therefore, when humidity appears at home, it should not be seen only as a stain that must be covered. It is a sign that something is happening in the balance between water, air, temperature, materials and ventilation of the home.
Understanding this relationship is the first step in choosing a suitable solution.
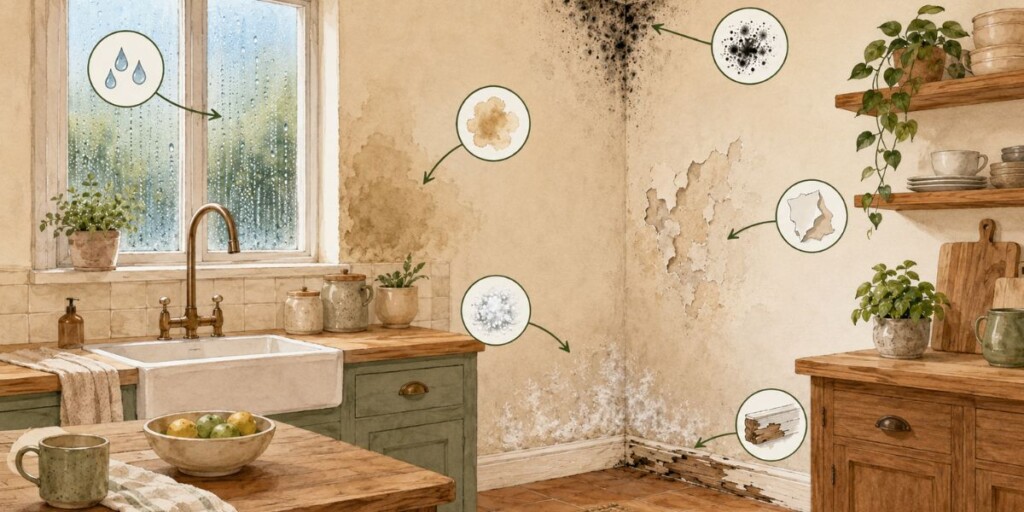
Moisture is not always detected in the same way. In some cases it appears very obviously, with spots, mold or chips. In others, it gives more subtle signs, such as a bad smell, cold sensation or foggy windows. Learning to recognize these signs is very useful, because it allows you to act before the problem progresses and causes further deterioration.
One of the most frequent signs is stains on walls or ceilings. They can be dark, yellowish, or grayish, and their shape varies depending on the cause. Sometimes they appear in corners, sometimes in the lower part of walls or around a window. Although they may seem similar at first glance, they do not all indicate the same type of humidity.
Another very common sign is the appearance of mold, especially in bathrooms, kitchens, cold corners, ceilings and areas with poor ventilation. It usually manifests as blackheads, greenish or grayish, and is often accompanied by an unpleasant odor. Mold not only affects the appearance of the home, but it can also worsen indoor air quality.
It is also common to find domed, chipped paint or coatings that come off. When a wall accumulates moisture, the finishes can lose adhesion, crack or lift. In some cases small pockets form, in others the material will flake or fall off, leaving the bottom support exposed.
In walls affected by humidity from the base, salts or saltpeter are frequently observed. They are identified as whitish spots, crystallizations, or white powder on the surface. Its presence usually indicates that water is passing through the wall and dragging mineral salts to the outside, something very common in damp by capillarity.
Another important clue is condensation on windows and glass. When glass is foggy or dripped with water on a regular basis, especially in winter or after showering and cooking, it can be a sign of excessive humidity and insufficient ventilation.
The home can also give less visible, but equally relevant signs. These include the smell of closed or damp, the feeling of a stuffy environment, textiles that seem to absorb moisture or a constant perception of cold in certain rooms. Many times these sensations appear before the problem is clearly visible.
In the lower part of some walls you can also see the deterioration of skirting boards, carpentry or floors near the wall. Wood can swell, warp or stain, and some finishes can lose stability over time.
These signals should not be interpreted in isolation. The important thing is to observe where they appear, when they recur and how they evolve. A mould that appears only on the ceiling of the bathroom is not the same as a wall that peels from the floor, nor a stain located after rain than a fogged glass every morning.
Therefore, before deciding how to act, it is advisable to pay attention to these first clues. They are the house’s way of warning us that there is an imbalance between water, materials, temperature and ventilation.
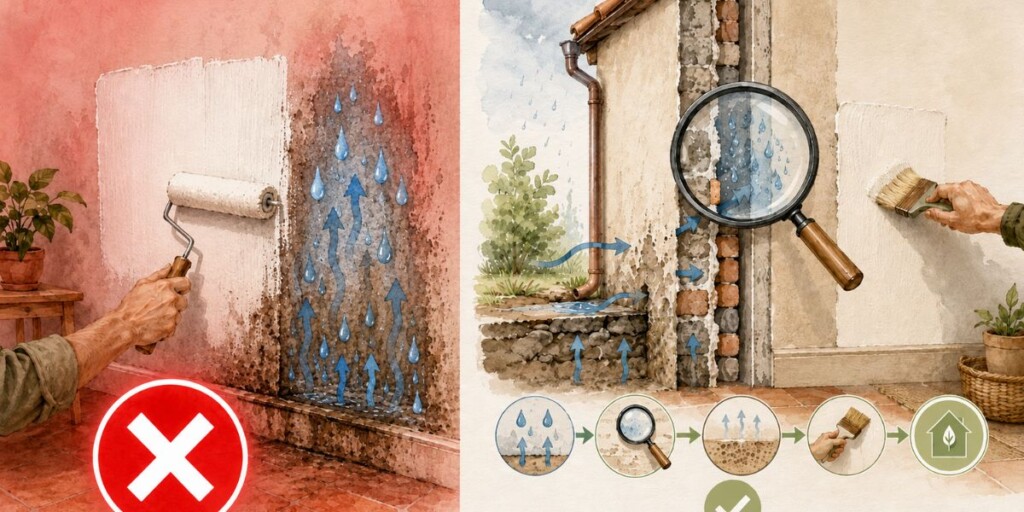
When damp appears at home, the most common thing is to want to solve it as soon as possible. It’s understandable: a stain on the wall, mold in the bathroom, or paint that peels off causes discomfort, worry, and a clear sense of deterioration. However, acting too quickly without understanding the cause can lead us to apply the wrong solution.
The first step shouldn’t be to choose a paint, mortar, or anti-moisture product, but to identify what’s causing the problem. Humidity is a visible sign, but it doesn’t always tell us on its own where the water or excess steam is coming from.
The same stain can have very different causes. It can be due to a leak from a terrace, condensation due to lack of ventilation, a leak in an installation, humidity rising from the ground or a material that does not allow the wall to dry properly. At first glance, they may all look “damp”, but each one needs a different response.
This point is key because many common solutions are applied directly to the affected surface. For example, painting over a stain, covering an area with a waterproof coating or applying an anti-mold product without checking the ventilation. These solutions may improve the appearance for a while, but if the source is still active, the moisture will return.
In some cases, it can even make the problem worse. If a wall needs to evaporate moisture and is covered with a layer that is too tight, water can be retained inside, look for another outlet or cause new landslides. Similarly, if there is active filtration, no interior finish will be a definitive solution as long as water continues to enter from the outside.
Therefore, before intervening, it is advisable to observe three basic aspects:
Where moisture appears.
A stain on the bottom of a wall is not the same as mold in a corner of the ceiling or condensation on a window.
When it appears or gets worse.
If it appears after rain, it may indicate a leak. If it intensifies in winter or after showering, it may be related to condensation. If it is maintained constantly at the base of a wall, it is advisable to assess a possible capillarity.
How it evolves over time.
A punctual humidity does not behave in the same way as a humidity that reappears every season, extending or degrading the substrate little by little.
Identifying the source allows you to choose a more coherent solution. In some cases, improving ventilation, reducing excess steam and using breathable finishes will suffice. In others, a leak will have to be repaired, a roof will have to be checked, a leak will have to be solved or the behaviour of an old wall will have to be studied.
From the bioconstruction approach, the priority is not to cover the humidity, but to understand it. First the case is resolved; then the support is allowed to dry when necessary; and finally materials compatible with the wall and the use of the room are chosen.
This approach avoids quick fixes that only hide the problem and helps to improve the durability of the finishes, the interior comfort and the health of the living space.
In short, before treating a wall with humidity, it is worth remembering a simple idea:
The best solution always starts with a good diagnosis.
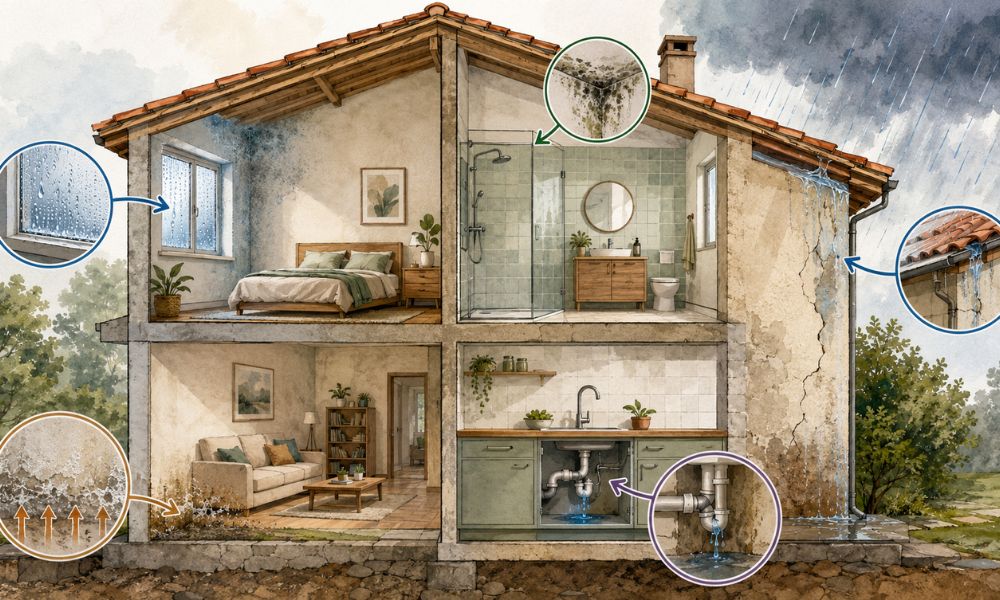
Once we have seen what humidity is and what its most frequent signs are, the next step is to identify what type of humidity may be affecting the home.
This point is important because not all humidity behaves in the same way. Some appear at specific times, such as after heavy rain or after a shower. Others are maintained consistently throughout the year. Some affect the lower part of walls, while others appear in corners, ceilings, windows or poorly ventilated areas.
Therefore, before talking about solutions, it is advisable to know the main types of damp that can appear in a home.
Condensation damp
Condensation humidity occurs when water vapour in indoor air comes into contact with a cold surface and transforms into tiny water droplets.
It is very common in homes with poor ventilation, cold walls, thermal bridges or excess indoor steam. It usually appears in winter, on windows, corners, ceilings, bedrooms, kitchens and bathrooms.
One of its most recognizable signs is black mold in specific areas, especially in corners, ceilings or exterior walls.
Humidity in bathrooms with mold stains
Although it is usually related to condensation, humidity in bathrooms deserves its own section because it is one of the most frequent consultations.
The bathroom is a particularly sensitive room because it concentrates water vapour, temperature changes and, in many cases, insufficient ventilation. This can cause mold stains on ceilings, corners, joints, silicone, or walls near the shower.
However, not all mold in a bathroom is necessarily due to condensation. In some cases, there may be a leak, a leak or a problem in a poorly resolved joint. That is why it is advisable to observe well where it appears and when it is repeated.
Rising damp
Capillary damp occurs when water from the ground rises through the pores of walls or building materials.
It is common on ground floors, old walls, homes in contact with the ground or buildings without an effective barrier against rising humidity.
It usually manifests itself in the lower part of the walls, near the skirting board, with chips, persistent stains, salts or saltpeter. It is one of the types of humidity that generates the most doubts, because many times there is an attempt to cover the behavior of the wall with paints or coatings without resolving the behavior of the wall.
Moisture by filtration
Moisture by filtration occurs when water enters from the outside or from a defective construction element.
It can come from a roof, a terrace, a cracked façade, a poorly sealed window, a deteriorated joint, or a wall in contact with the ground.
It usually appears as a localized spot that worsens when it rains or when the affected element receives water. In these cases, the priority is to locate and resolve the entry point. If water keeps coming in, any interior finish will be a temporary fix.
Moisture from leakage or breakdown
Leakage damp occurs when there is a loss of water in an installation: pipes, drains, downpipes, heating or hidden installations in walls and floors.
Unlike other types of moisture, it tends to appear in a more localized manner and can grow over time if the leak is still active.
In these cases, the first thing is always to locate and repair the fault. The substrate will then have to be allowed to dry properly before applying paints, mortars or coatings.
Moisture from use and lack of ventilation
In addition to the above types, many homes accumulate moisture from daily use.
Showering, cooking, hanging clothes inside, using heating without renewing the air or keeping the house very closed can greatly increase the indoor humidity.
When this humidity is not evacuated properly, it can promote condensation, mold and the feeling of a stuffy environment. In these cases, the solution does not depend only on a material, but on improving ventilation, reviewing habits and using suitable finishes for the use of the room.
In summary, the most common damp in homes can have very different origins. Some come from indoor air, some from the ground, some from outside, and some from a damaged facility.
Therefore, the key question is not only “which product to apply”, but:
What kind of humidity do I have and what is causing it?
From there it will be much easier to assess a coherent, durable and compatible solution with the home.
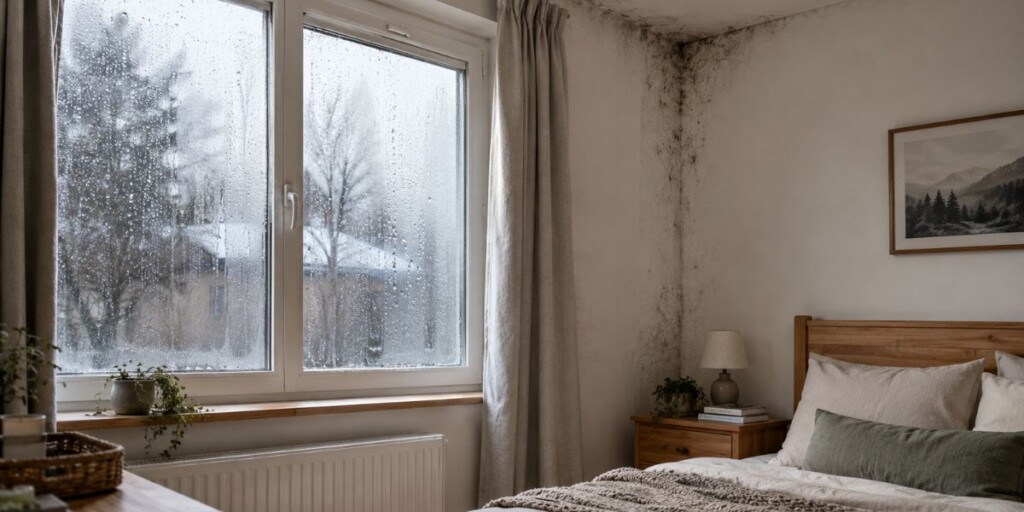
Condensation damp is one of the most common in homes. It occurs when water vapor present in indoor air comes into contact with a cold surface and is transformed into small droplets of water.
It’s the same phenomenon we see when a mirror fogs up after a shower or when drops appear on the inside of a window during the cold months. In a home, this process can be repeated every day on walls, ceilings, corners or glass, until stains, mold and deterioration of the finishes are generated.
Condensation usually appears when several factors coincide: excess ambient humidity, poor ventilation and cold surfaces. That is why it is common in winter, when homes are more closed, there is less ventilation and there is a greater temperature difference between the interior and exterior.
It can also appear in rooms where a lot of water vapor is generated, such as bathrooms and kitchens, or in bedrooms where moisture accumulates during the night. Although liquid water is not always visible on the wall, the environment may be favouring the appearance of mould in certain areas.
Where condensation damp usually appears
Condensation usually manifests itself in the coldest or worst ventilated points of the house. Some common places are:
One of the most common cases is black mold in the upper corners of a room or on the ceiling of the bathroom. It is also common to find condensation on windows in the morning, especially when the house has been closed all night.
Why condensation appears
The indoor air of a home always contains a certain amount of water vapour. This vapor comes from everyday activities such as showering, cooking, breathing, hanging clothes inside the house, washing, using heating or keeping many plants in poorly ventilated spaces.
When that moist air meets a cold surface, it can reach its saturation point and the vapor is transformed into water. If this happens on a one-off basis, it may not cause a major problem. But if repeated daily, moisture accumulates on the materials and creates favorable conditions for mold growth.
For this reason, condensation does not depend only on “having a lot of humidity”, but also on the relationship between ambient humidity, temperature, ventilation and surface temperature of the walls.
A cold wall, a window with poor thermal performance or a corner with a thermal bridge can become points where humidity condenses easily.
Common signs of condensation
Condensation damp usually leaves quite recognizable signs:
An important clue is that condensation is usually related to the use of the home. It may get worse after showering, cooking, sleeping with the room closed, or hanging clothes indoors. It is also usually more visible in cold seasons, when the interior surfaces are at a lower temperature.
Condensation and thermal bridges
In many homes, condensation appears at specific points in the envelope: corners, pillars, façade joints, shutter boxes or areas where insulation is insufficient or discontinuous.
These points are known as thermal bridges. These are areas where the interior surface temperature is lower than in the rest of the wall. As they are colder, they encourage air vapour to condense on them.
That’s why, in some cases, cleaning mold or painting the wall isn’t enough. If the surface is still cold and ventilation does not improve, the problem may return.
How Condensation Moisture Can Be Reduced
The solution to condensation does not usually depend on a single product. It usually requires acting on several causes at the same time.
Some important measures are:
Improve ventilation.
Proper ventilation helps to renew indoor air and reduce excess accumulated steam. In bathrooms and kitchens it may be necessary to have extractors or ventilation systems that work properly.
Reduce steam production.
Small habits such as covering pots when cooking, avoiding hanging clothes indoors or ventilating after showering can help control ambient humidity.
Avoid furniture stuck to cold walls.
When a piece of furniture is very close to an exterior wall, the air does not circulate well and the surface can remain colder and more humid. Leaving a small gap can reduce the risk of mold.
Improve the thermal behaviour of the house.
When condensation is due to very cold walls or thermal bridges, it may be necessary to study construction solutions that improve thermal comfort and reduce cold surfaces.
Choose breathable and compatible finishes.
Paints and coatings that are too tight can make it difficult to manage steam on some media. In certain cases, mineral and breathable finishes can help the wall to have a more balanced behavior.
Use materials with hygroscopic capacity.
Materials such as clay or lime can help regulate part of the indoor humidity, always within a well-planned system and without replacing ventilation or the correction of the source of the problem.
What not to do
One of the most frequent mistakes is to paint on top of mold thinking that the problem will disappear. If the cause remains the same, mold may soon reappear.
It is also not advisable to use a waterproof paint as the only solution if the ventilation, the surface temperature of the wall or the possible thermal bridge have not been checked. In some cases, blocking the surface can displace the problem or make it difficult for the substrate to dry.
Condensation should be understood as a problem of inner balance. It’s not just about cleaning a stain, but about reducing excess steam, improving air renewal and avoiding surfaces that are too cold.
In summary
Condensation humidity occurs when indoor air vapor turns into water when it comes into contact with cold surfaces. It is common in poorly ventilated homes, bathrooms, kitchens, bedrooms, windows and areas with thermal bridges.
To treat it correctly, it is necessary to observe where it appears, when it occurs and what conditions favor it. Only then will we be able to choose a coherent solution that combines ventilation, appropriate habits, thermal improvement and compatible materials.
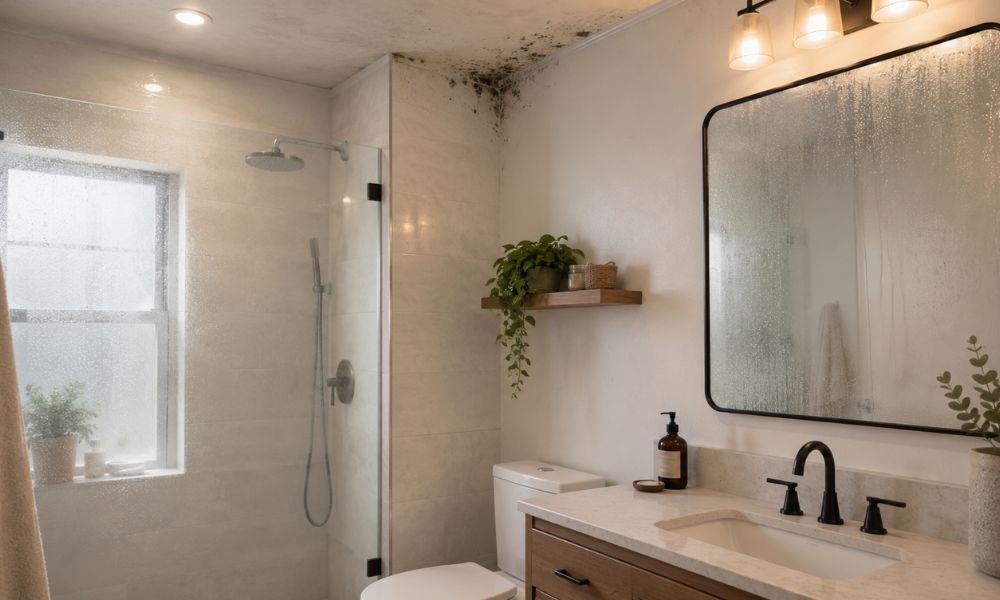
Bathrooms are one of the areas of the house where damp and mould stains most commonly appear. It is logical: they are spaces where a lot of water vapour is generated in a short time, especially during the shower, and where there is not always enough ventilation to evacuate that moisture.
When the vapor is retained in the environment, it comes into contact with cold surfaces such as ceilings, walls, windows, mirrors, joints or corners. If this happens repeatedly, dark stains, black mold, deteriorated paint or bad odor may appear.
In many cases, bathroom mold is related to condensation. However, this is not always the case. It can also be due to a leak in the shower area, a poorly sealed joint, a leak in an installation or even a construction problem in the enclosure. Therefore, before painting or applying an anti-mould product, it is advisable to take a good look at where the moisture appears and how it behaves.
Black mold usually appears when there is persistent moisture on a surface and little air renewal. In bathrooms, this happens easily because the steam from the shower accumulates in the environment and is deposited on the coldest or least ventilated areas.
The most common areas are:
The problem is usually not only the occasional presence of steam, but the daily repetition. If the bathroom remains closed after each shower, the surfaces do not dry well and the environment maintains a high humidity level for a long time.
As the days go by, this accumulated humidity favors the appearance of mold.
One of the most common doubts is to know if the mold in the bathroom comes from condensation or from a leak.
Although the definitive diagnosis should be made by a professional when the problem is persistent, there are some clues that can help guide us.
When humidity is related to condensation, it usually appears in cold and poorly ventilated areas: corners, ceilings, windows or exterior walls. It also tends to worsen in winter, after showering or when the bathroom is closed.
On the other hand, a leak usually manifests itself in a more localized way. It can appear near the shower, on a specific wall, next to a joint, on the ceiling of a lower house or in an area that worsens when water is used. If the stain remains moist even though the bathroom is ventilated, or if it grows over time, it is advisable to check for a leak or ingress of water.
You should also pay attention to joints, shower trays, bathtubs, encounters with screens and areas where water can penetrate. A deteriorated joint can allow water to pass into the substrate, generating moisture that will not be solved with paint alone.
Painting directly on mold is not a good solution. It may improve the appearance for a while, but if the cause is still active, the problem will come back.
Before painting, it is advisable to follow some basic steps:
First, you have to check the ventilation. If the bathroom does not have a window or the extractor fan is not working properly, steam will continue to accumulate every time the shower is used.
Afterwards, it is important to clean the affected area properly and remove traces of deteriorated paint if any. If the substrate is wet, soft, chipped or stubbornly stained, it should not be covered without first checking its condition.
It is also advisable to observe if the humidity always appears in the same areas. If it’s concentrated in a cold corner, there’s probably a condensation problem. If it appears next to a shower, bathtub or installation, it may be necessary to check for possible leaks.
Finally, the substrate must be allowed to dry well before applying any finish. Paint, on its own, should not be used to lock moisture inside a wall.
The solution to humidity in bathrooms usually combines several measures. It is not enough to choose a paint if the space is not well ventilated or if there is an active water ingress.
A first measure is to improve air renewal. In bathrooms without a window, the extractor fan is especially important. It should work properly and stay on long enough to evacuate the steam after showering.
It also helps to ventilate after use, leave the door open when possible, and prevent surfaces from staying wet for a long time. Drying critical areas, such as screens, joints or corners, can reduce the accumulation of surface moisture.
If the bathroom has cold walls or ceilings, it may be necessary to consider construction improvements that reduce condensation. Cold surfaces encourage steam to transform into water, especially in winter.
As for the finishes, it is advisable to choose materials that are compatible with the use of the bathroom. In some cases, mineral paints, lime paints or certain breathable coatings can be an interesting alternative to finishes that are too tight, as long as the substrate is healthy, dry and well prepared.
In areas of direct contact with water, such as showers or bathtubs, a distinction must be made between breathability and water resistance. Not all materials are suitable for continuous direct water. That’s why it’s important to choose the right system according to the area: a ceiling with condensation is not the same as a wall inside the shower.
From a healthier approach, the goal shouldn’t be to simply “kill mold” or cover it up, but to reduce the conditions that allow it to appear: excess steam, lack of ventilation, cold surfaces, or poorly resolved supports.
Some mistakes are repeated very frequently when mold appears in bathrooms.
One of the most common is to apply anti-mold paint without checking the ventilation. If the bath continues to accumulate steam every day, the problem may return.
Another mistake is to use very waterproof products in any area of the bathroom without assessing the support. In some cases they may be necessary, especially where there is direct water, but applied without criteria they can make it difficult to dry certain surfaces.
It is also common to clean mold superficially without correcting the cause. Cleaning may be necessary, but if moisture is still present, mold will find conditions to develop again.
Finally, many times there is no difference between condensation and filtration. If the origin is a faulty gasket, a leak or a water ingress, the solution will not be in the paint, but in repairing the point where moisture enters.
In summary
Damp in bathrooms is usually related to condensation, excess steam and lack of ventilation, but it can also be due to leaks or leaks.
Before painting a bathroom with mould, it is advisable to check the ventilation, check the condition of the support, rule out water ingress and choose a suitable finish for each area.
In bathrooms, as in the rest of the house, the key is not to limit yourself to covering the stain. First you have to understand why it appears.
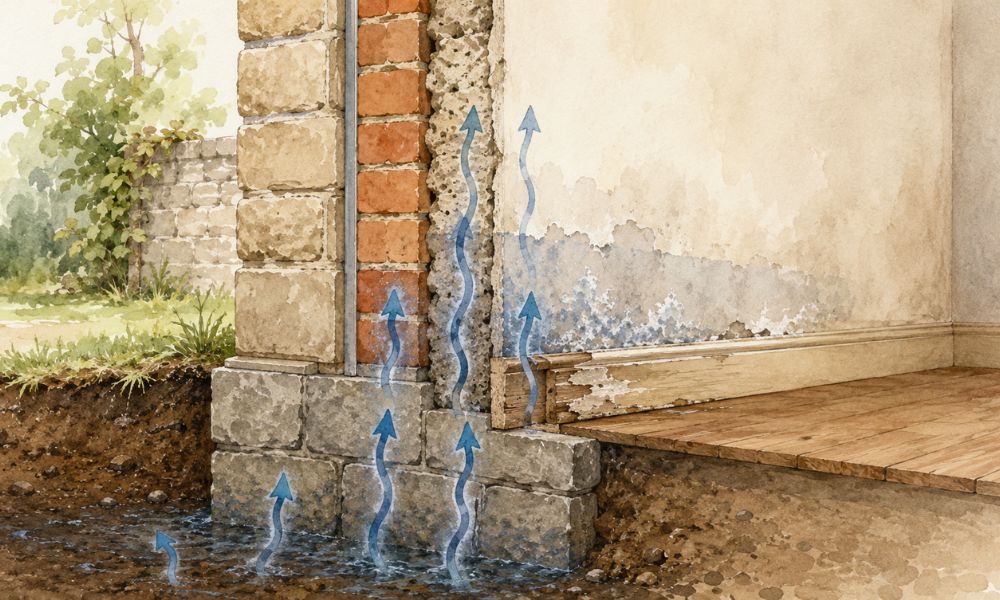
Rising damp is one of the most common problems on ground floors, old homes, walls in contact with the ground and buildings without an effective barrier against rising damp.
It occurs when water present in the ground rises through the pores of the building materials. Although at first glance it may seem strange, many construction materials function as a network of small ducts capable of absorbing and transporting moisture upwards, especially if they are in direct contact with a wet soil.
This phenomenon can affect stone walls, brick, rammed earth, adobe, old mortars or traditional factories. It can also appear in more recent constructions if there is not adequate protection against the moisture of the ground or if the original solution has failed over time.
Unlike a spot filtration, rising damp usually advances from the base of the wall upwards. That is why its signs usually appear near the floor, in the area of the skirting board or in the lower part of the walls.
Rising damp usually has a fairly characteristic behaviour. Although it is always advisable to confirm the diagnosis with a professional, there are some signs that can help us identify it.
One of the clearest clues is that moisture appears in the lower part of the wall. It doesn’t usually start at the ceiling or high up in the wall, but near the floor. It can affect one or more walls and be maintained at a more or less constant height, although this height can vary depending on the type of wall, the level of humidity of the ground, ventilation and the materials used.
The most common signs are:
In many cases, the wall seems to improve after a superficial intervention, but the problem returns after a while. This happens because the underlying cause is still present: the wall continues to absorb moisture from the ground.
One of the most common symptoms of rising damp is the presence of saltpeter on the surface.
When the water rises up the wall, it does not rise completely clean. It can carry mineral salts present in the soil, in construction materials or in old mortars. When it reaches the surface, the water evaporates, but the salts are deposited on the finish.
These salts usually appear as white spots, crystalline dust, or whitish areas on the underside of the wall. They are sometimes mistaken for dirt, but they are actually an important sign that the wall is transporting moisture and minerals to the surface.
The problem with salts is not only aesthetic. When they crystallize, they can put pressure on finishes and cause paint, plaster, or mortar to flake off. For this reason, covering saltpeter without understanding its origin is usually a temporary solution.
If the wall is still wet, the salts will reappear.
One of the most frequent mistakes in the event of rising damp is to cover the wall with a waterproof paint, a closed coating or a lining without first studying the behaviour of the wall.
In the short term, these solutions can hide the stain and improve the appearance of the room. But if water continues to rise from the ground, moisture will continue to accumulate inside the wall or look for another outlet.
This can lead to several problems:
On old walls, this point is especially important. Many of these walls were built with materials that need to breathe and dry naturally. If they are covered with layers that are too impermeable, they can lose some of their evaporation capacity and the problem can be aggravated.
Therefore, rising damp should not be treated only as a stain to be hidden. It is a problem of the relationship between land, wall, materials and evaporation.
Solutions against rising damp can vary greatly depending on the type of building, the condition of the wall, the presence of salts, the level of humidity and the possibilities of intervention.
There is no one-size-fits-all solution.
Common solutions include:
Physical or chemical barriers to rising humidity.
They seek to interrupt the rise of water from the ground. In some cases, they are performed by injections, cuts or specific systems. These are interventions that must be assessed and executed by professionals, especially in old buildings or walls with constructive value.
Drainage and improvement of contact with the ground.
When the wall is highly exposed to moisture from the ground or the outside environment, it may be necessary to study solutions that reduce the presence of water in contact with the construction.
Cleaning of deteriorated coatings.
In many cases it is necessary to remove degraded paints, plasters or mortars in order to work on a more stable support. This step must be done carefully so as not to unnecessarily damage the wall.
Specific mortars for wet walls.
There are mortars formulated to promote evaporation and better manage the presence of salts. However, not all “anti-humidity” mortars work the same or are compatible with any substrate.
Breathable and compatible finishes.
Once the origin of the problem has been understood and the cause has been treated to the necessary extent, it may be advisable to use mineral and breathable finishes that allow a better performance of the wall.
From a bio-construction perspective, the aim is not to simply block moisture, but to favour a solution that is compatible with the wall, its construction history and its drying capacity.
Ancient walls require special attention. Many are built with stone, solid brick, rammed earth, adobe, lime or traditional mortars. These materials often behave differently from modern construction systems.
In many cases, the wall has functioned for decades or centuries thanks to its ability to absorb, release, and balance a certain amount of moisture. The problem arises when this balance is broken: due to changes in the terrain, poorly planned renovations, application of cements that are too hard, plastic paints, lack of ventilation or impermeable soils that modify the path of humidity.
Therefore, before intervening on an old wall, it is advisable to take into account some precautions:
In rehabilitation, lime mortars and other breathable mineral materials can be very interesting, as long as they are used within a well-thought-out solution. It is not a question of applying lime as an automatic response to any humidity, but of understanding when the wall needs compatibility, breathability and respectful intervention.
In summary
Capillary dampness appears when water from the ground rises through the pores of walls and materials. It usually manifests itself in the lower part of the walls, with stains, chips, saltpeter and deterioration of the finishes.
It is a type of humidity that should not be covered without diagnosis, especially in old walls. Before painting, coating or waterproofing, it is necessary to understand the origin, assess the presence of salts and choose a solution compatible with the substrate.
In these cases, the most prudent approach is to resolve or reduce the entry of moisture, allow the wall to dry when necessary, and use mineral, breathable materials appropriate to the type of construction.
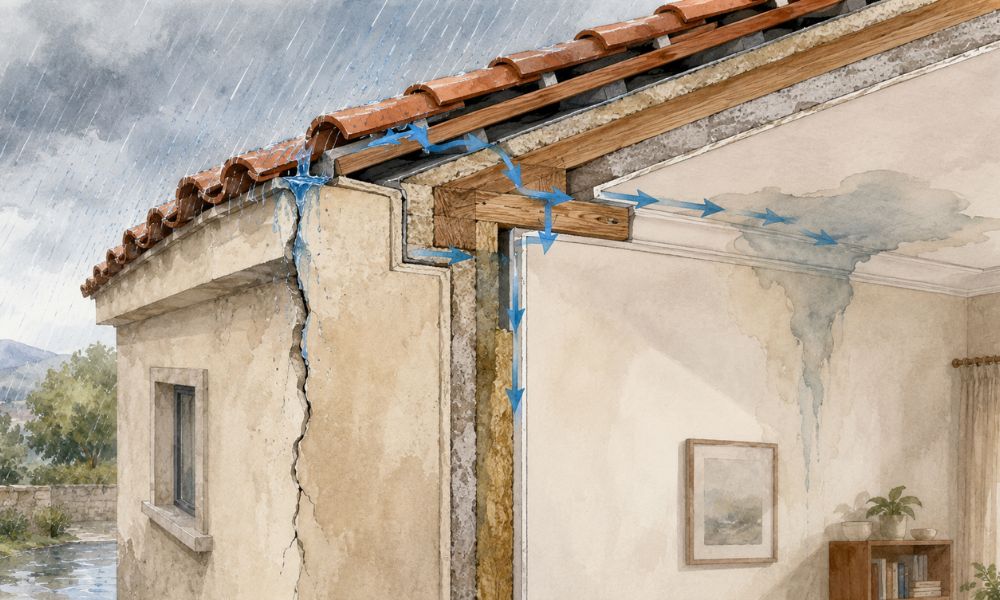
Moisture due to filtration appears when water enters the house from the outside or from a construction element that is not working properly. Unlike condensation, which is usually related to indoor steam, filtration involves a direct entry of water through some vulnerable point in the building.
It can occur on roofs, terraces, facades, patios, buried walls, carpentry, joints, cracks or poorly resolved construction joints. It can also appear when an exterior material has lost its protective capacity or when a waterproofing has deteriorated over time.
In these cases, the moisture does not originate on the interior surface of the wall, but reaches it after going through part of the enclosure. For this reason, many times the stain we see inside the house does not exactly coincide with the point where the water is entering.
Seepage damp can appear in different areas of the house, depending on where the water is entering.
Some common places are:
A very characteristic sign is that humidity appears or worsens after episodes of rain. Sometimes it manifests itself immediately, but in other cases it can take hours or even days, depending on the route that the water makes inside the enclosure.
Leaks usually leave quite recognizable signs, although they can be confused with other types of humidity if their behavior is not properly observed.
Among the most frequent signs we find:
In many cases, the stain does not extend from the floor upwards, as is the case with capillarity, but appears in a specific area of the ceiling or wall. You can also move down following the path of the water.
Leakage can have many causes. Some are obvious, such as a leak in a roof. Others are more difficult to detect because water enters at one point and appears at another.
Among the most common causes are:
Deteriorated roofs.
Displaced shingles, poorly resolved joints, damaged waterproof sheets, or singular spots without sufficient protection can allow water to enter.
Terraces and rooftops.
A terrace with incorrect slopes, deteriorated joints, clogged drains or aged waterproofing can cause leaks into the lower house or into nearby walls.
Fissured facades.
Small cracks, degraded exterior cladding or open joints can allow rainwater to penetrate the enclosure.
Poorly sealed carpentry.
Windows, balcony doors or exterior doors can generate leaks if the joints, seals or joints with the façade are not well resolved.
Gutters and downspouts.
A clogged gutter, a broken downspout or an overflow of water can cause dampness on the façade and, over time, affect the interior.
Buried walls or in contact with ground.
In basements, semi-basements or walls against the ground, water can exert pressure from the outside and seep into the interior if there is no suitable drainage or waterproofing solution.
One of the most frequent mistakes in damp due to filtration is to try to solve it only from the inside. Painting, applying a waterproof coating, or covering the stain may improve the look for a while, but if water keeps coming in from outside, the problem will reappear.
In an active leak, the priority should be to locate the entry point and correct it. If the origin is in a roof, a terrace, a façade or a carpentry, action will have to be taken on that element. Otherwise, any interior finish will be working against a water ingress that continues to be active.
In addition, if the inner face is blocked without resolving the exterior entrance, moisture can be trapped inside the wall. This can cause new landslides, stains in nearby areas, degradation of materials or accumulation of salts.
Therefore, in leaks, the interior finish should be understood as the last phase of the intervention, not as the first.
When we suspect that dampness may be due to filtration, it is advisable to observe when it appears and how it evolves.
Some helpful questions include:
These questions are not a substitute for a professional diagnosis, but they help to guide the problem. If the humidity is persistent, reappears after each rain or affects important construction elements, it is advisable to consult a specialized technician or professional.
The solution will depend on the source of the water ingress. A roof leak is not the same as a water entry through a window or a buried wall.
Some common interventions may include:
From a responsible approach, the water inlet must first be cut off, then allow the substrate to dry properly, and finally choose the appropriate interior finish.
Breathable materials can be very useful in renovation and interior finishes, but they should not be confused with a direct solution to active filtration.
A mineral paint, lime mortar or breathable coating can help a wall to better manage vapour and behave more in a way that is more compatible with certain substrates. However, if water continues to enter from a roof, terrace or façade, the problem will not be solved by the interior finish alone.
Breathability is important, but it is not a substitute for repairing the source.
Therefore, in a damp filtration, the correct order would be:
In summary
Filtration damp occurs when water enters the home from the outside or from a defective construction element. It can come from roofs, terraces, facades, windows, gutters, downspouts or walls in contact with the ground.
Its most characteristic sign is that it usually appears or worsens with rain, although it does not always manifest itself right at the point where the water enters.
In these cases, the solution should not be limited to painting or covering the interior stain. First, the water ingress must be located and resolved. The support can then be cleaned up and a compatible finish can be chosen, preferably mineral and breathable when the type of wall requires it.
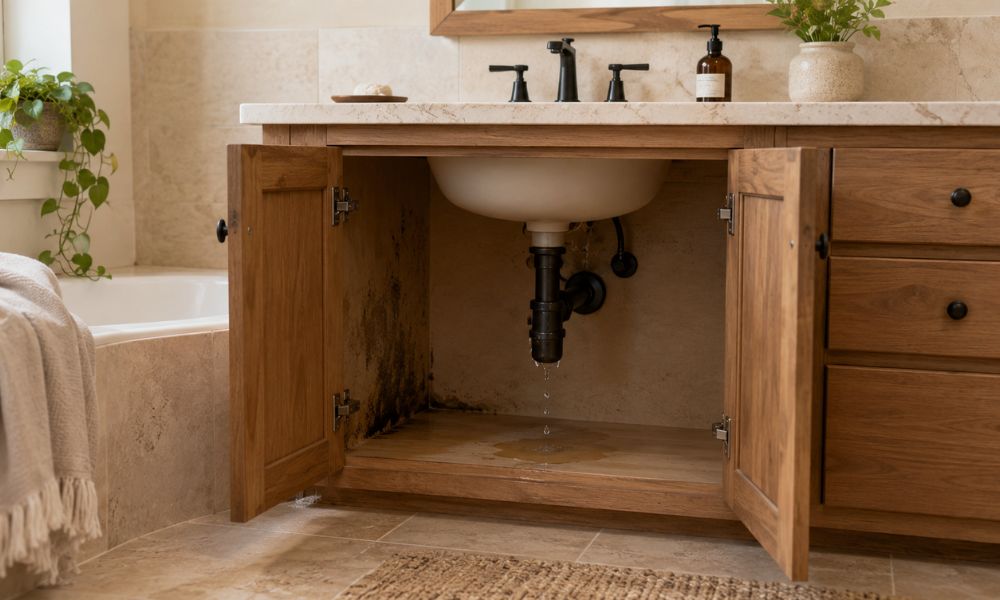
Moisture due to leakage or breakdown appears when there is a loss of water in an installation of the house. It can be caused by a damaged pipe, a leaky drain, a downspout, a heating installation, a faulty gasket, or any hidden element through which water is circulating.
Unlike other damp, such as condensation or capillarity, in this case the origin is usually at a specific point in the installation. However, the stain we see on the wall, ceiling, or floor does not always exactly match where the leak occurs. Water can travel around the inside of a partition, follow a slope, pass through materials or accumulate in an area before becoming visible.
Therefore, when localised and persistent humidity appears, especially near bathrooms, kitchens, laundry rooms, radiators, downpipes or areas with installations, it is advisable to assess the possibility of a leak.
Leaks can appear in many areas of the house, but they are more common in spaces where there are water or drainage installations.
Some common areas are:
They can also appear in neighbouring homes, especially when the leak comes from an upper floor. In these cases, moisture can manifest as a stain on the ceiling, a water fence, bulging paint or even dripping.
Leakage damp usually behaves differently from other damp. Although it is not always easy to differentiate them with the naked eye, there are signs that can guide the diagnosis.
Among the most common signs we find:
An important clue is that leak moisture is not usually dependent on rain or ventilation. It can appear at any time of the year and remain active as long as the installation continues to lose water.
In some cases, the leak is obvious. In others, it may be very small and progress slowly over weeks or months before showing visible signs.
A leak can be mistaken for a leak or even condensation, especially when it appears on ceilings, corners or walls near bathrooms.
The main difference is in the origin.
Condensation is related to interior steam, cold surfaces and lack of ventilation. It usually appears in bathrooms, windows, corners, or cold areas, and usually worsens in winter or after generating steam.
Filtration occurs when water enters from the outside or from a defective construction element, such as a roof, terrace, façade or carpentry. It usually worsens with rain.
The leak, on the other hand, comes from an installation. It can be related to the use of a bathroom, kitchen, shower, downspout, or hidden pipe. If the stain appears near facilities or is not clearly related to rain or ventilation, it is advisable to review this possibility.
Sometimes, a simple way to address the problem is to look at when it gets worse. If the humidity increases after using the shower, turning on a tap, turning on the heating or flushing a cistern, there may be a leak or a leak in a connection.
In the event of a possible leak, the priority should not be to paint or cover the stain. The first thing is to locate the source of the loss and repair it.
In many cases it will be necessary to have a plumber, a specialized company or a technician who can check installations, pipes, drains, downspouts or heating systems.
Once the leak has been repaired, it is not advisable to apply a new finish immediately. The support needs to dry properly. Depending on the material, wall thickness, ventilation, and how long it has been exposed to water, drying can be slow.
If painted or coated too early, residual moisture can become trapped and cause new chips, stains, odors, or mold growth.
The correct order would be:
An active leak is not fixed with paint, mortar, coating, or interior waterproofing. These products can temporarily hide the stain, but they do not stop water loss within the facility.
In fact, covering a leak without repairing it can compound the problem. The water will continue to circulate inside the wall, roof or floor, and may affect other materials, installations, carpentry, furniture or adjacent homes.
In addition, when the surface is blocked, it can be more difficult to detect the actual evolution of humidity. The wall may appear dry on the outside as water continues to collect on the inside.
Therefore, in a leakage damp, the finish should always be the last phase of the intervention, not the first.
Once the fault has been located and repaired, the condition of the support will have to be assessed. Not all materials react in the same way to a leak.
It may be necessary to remove deteriorated paint, affected plaster, soft mortars, damaged plates, swollen skirting boards or elements that have lost stability. Afterwards, the holder must dry before applying any new product.
When the support is dry and sanitized, the appropriate finish can be chosen according to the type of wall and the use of the room. Indoors, mineral paints, lime paints, compatible mortars or breathable coatings can be an interesting option in certain cases, especially if we want to avoid finishes that are too tight.
However, the choice will always depend on the support, the level of deterioration and the area of the house. It is not the same to repair a wall in a bedroom as it is to repair an area near a shower, a kitchen or a laundry room.
It is advisable to consult a professional when:
In these cases, a quick diagnosis can prevent further damage. The sooner the leak is located and repaired, the less deterioration of the materials will be and the easier the subsequent repair of the finish will be.
In summary
Moisture due to leakage or breakdown occurs when an installation loses water. It can appear on walls, ceilings or floors, especially near bathrooms, kitchens, downspouts, radiators or areas with hidden pipes.
Their solution is not to cover the stain, but to locate and repair the leak. Then you will have to let the support dry, clean the affected materials and choose a finish compatible with the area and type of wall.
In a leak, as in any humidity, the key is to act on the origin before thinking about the final finish.
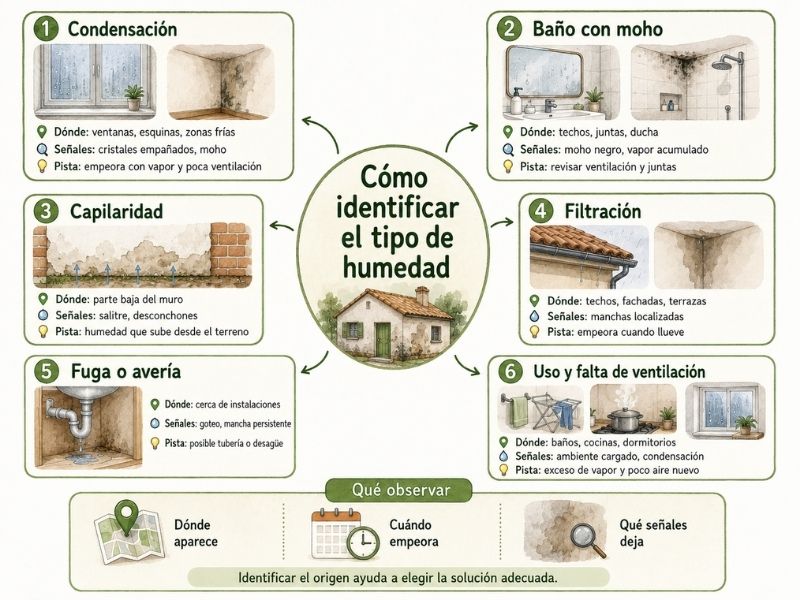
After reviewing the main types of humidity, it may be helpful to summarize their differences in a simple table. Although many damp conditions may seem similar at first glance, their origin, behaviour and solution can be very different.
| Moisture Type | Where it usually appears | Common signs | Possible cause | Recommended first step |
|---|---|---|---|---|
| Condensation damp | Windows, corners, ceilings, exterior walls, bedrooms, kitchens, and cold areas | Foggy glass, drips on windows, black mold, smell of closed, stains on corners | Excess indoor steam, poor ventilation, cold surfaces or thermal bridges | Improve ventilation, reduce interior steam and check cold areas |
| Humidity in Moldy Bathrooms | Ceilings, corners, joints, shower area, silicone, walls near the bathroom | Black mold, foggy mirror, accumulated steam, stains on ceiling or corners | Condensation, insufficient ventilation, deteriorated joints or possible leakage | Check ventilation, clean and sanitize, rule out leaks or leaks |
| Rising damp | Lower part of walls, ground floors, walls in contact with the ground, areas near the skirting board | Saltpeter, peeling paint, stains from below, deteriorated skirting boards, degraded mortar | Rise of moisture from the ground through the pores of the wall | Assess the wall, check salts, avoid covering with impermeable materials and consult technical diagnosis |
| Moisture by filtration | Roofs, interior facades, terrace-side walls, decks, windows, or patios | Localized stain, fences, leaks, bulging paint, moisture that worsens with rain | Water ingress from outside, roof, terrace, façade, carpentry or defective joint | Locate the entry point and repair the source before acting inside |
| Moisture from leakage or breakdown | Walls, ceilings or floors near bathrooms, kitchens, downpipes, radiators or installations | Localized stain, dripping, persistent moisture, odor, raised ground, increased water consumption | Leakage in pipes, drains, downspouts, heating or hidden installations | Locate and repair the leak, check the drying of the substrate and then clean up |
| Moisture from use and lack of ventilation | Very closed homes, bathrooms, kitchens, bedrooms, laundry rooms and areas where clothes are hung | Stuffy environment, musty smell, frequent condensation, recurring mold | Excess steam generated by daily use and little air renewal | Improve ventilation habits, evacuate steam and assess air renewal systems |
This table is not a substitute for a professional diagnosis, but it can help guide you before acting. The key is to observe where moisture appears, when it manifests itself and what signs accompany it.
This comparison helps to understand why it is not advisable to apply the same solution in all cases. A paint may seem sufficient in the face of a stain, but if there is a leak, a leak or a rising damp, the problem will reappear as long as the source is still active.
It is also important to remember that several types of humidity can coincide in the same home. For example, a bathroom may have condensation due to lack of ventilation and, at the same time, a leak in a shower joint. A ground floor may have damp due to capillarity and, in addition, mold in a cold corner due to condensation.
Therefore, this table should be understood as a first orientation. The next step will always be to observe the behavior of the humidity and assess whether it is necessary to consult a professional.
The most important question remains the same:
What is really causing this humidity?
Answering this question well allows you to choose a more appropriate solution, avoid unnecessary interventions and better protect the materials of the home.
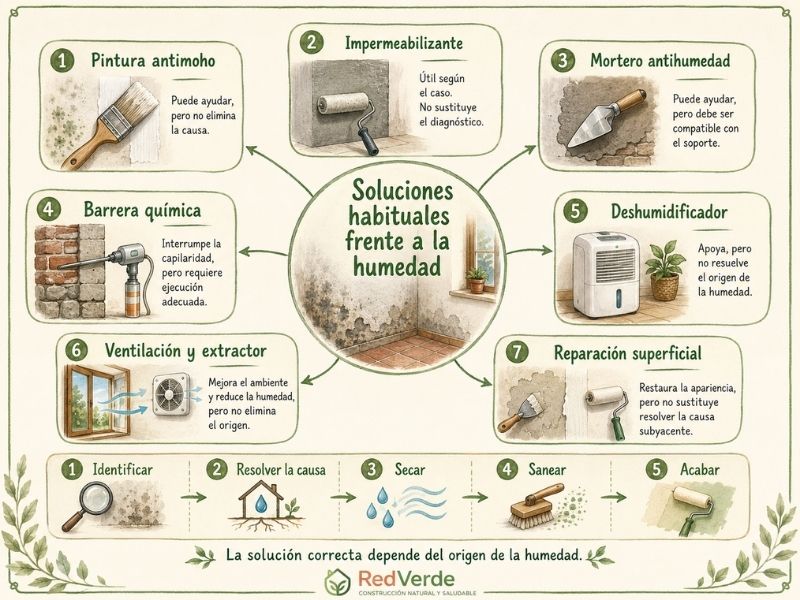
Once the type of humidity has been identified, the question that many people ask themselves arrives: what solution should I apply?
There are many responses to humidity on the market: anti-mould paints, waterproof paints, anti-humidity mortars, chemical barriers, dehumidifiers, extractors, ventilation systems or surface repairs. Some may be useful in certain cases, but none should be applied without first understanding the source of the problem.
The risk is in looking for a quick solution for a visible sign – a stain, mold, saltpeter or peeling paint – without solving the cause that is causing it. If the moisture is still active, any finish can fail over time.
For this reason, in this block we are going to review the most common solutions against humidity, explaining what they can provide, in which cases they can be useful and what their main limitations are.
It is not a matter of discarding some solutions and accepting others automatically. It is a matter of understanding that each intervention must respond to the type of humidity, the state of the support and the use of the room.
In the following sections we will see:
The main idea of this block is simple: a solution to moisture only works well when it responds to the real cause of the problem.
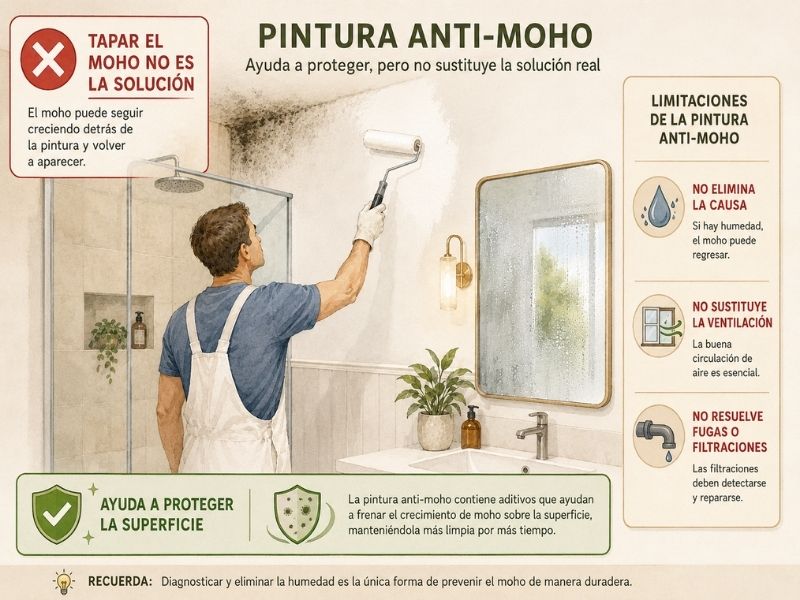
Anti-mold paints are a well-known solution for walls and ceilings where mold stains appear, especially in bathrooms, kitchens, and poorly ventilated areas.
Their main advantage is that they help improve surface resistance against the appearance of mould. That is why they can be an interesting option in damp rooms, as long as the substrate is clean, dry and correctly prepared.
However, it is important to be clear that an anti-mold paint does not eliminate the cause of the problem by itself. If moisture is still present, if there is daily condensation, if the bathroom does not ventilate well, or if there is a leak or leak, mold can reappear over time.
Therefore, its usefulness is limited when used as the only answer. Painting on top of mold without sanitizing the surface or without correcting the source of the moisture usually gives only a temporary result.
From a healthier approach, the important thing is not only to protect the surface, but also to improve the conditions that favor the appearance of mold: excess steam, poor ventilation, cold surfaces or substrates that do not dry well.
In some cases, a mineral or breathable paint can be an interesting alternative, as long as the cause of the humidity is already controlled and the product is compatible with the support and the use of the room.
In summary
Anti-mold paints can help prevent the surface appearance of mold, but they should not be confused with a complete solution against moisture. Before applying them, the cause of the problem must be cleaned, sanitized and corrected.
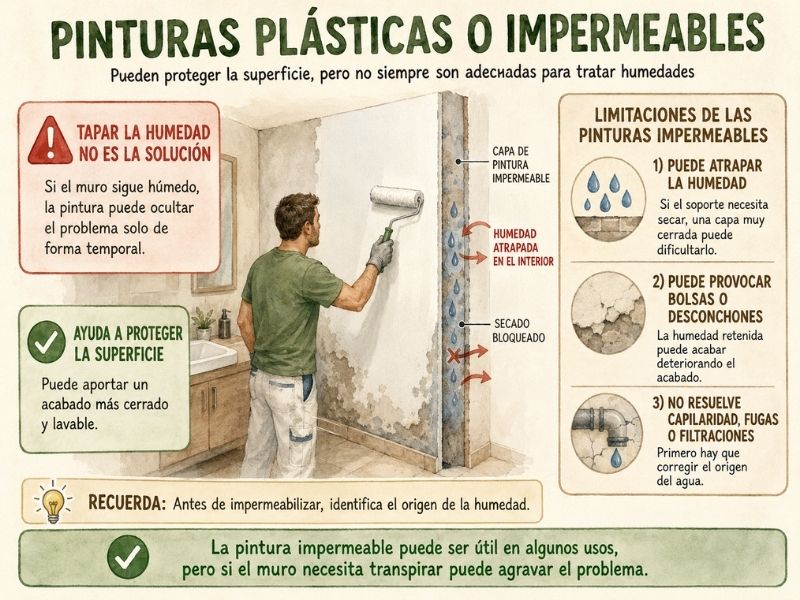
Plastic or waterproof paints are frequently used when moisture appears on a wall because they offer a quick feeling of protection. By forming a tighter film on the surface, they can seem like an effective solution for blocking stains, preventing water from marking the finish, or making cleaning easier.
In some cases they can make sense, especially in areas where a washable surface or more resistant to daily use is needed. However, they are not always suitable for treating moisture problems.
Their main drawback is that they can make it difficult for the support to breathe. If a wall contains moisture inside and is covered with a layer that is too tight, water can be retained inside the wall, causing pockets, chipping, or seeking an outlet in other areas.
This is especially delicate in old walls, walls affected by capillarity, supports with salts or enclosures that need to evaporate part of the moisture they contain.
Therefore, applying a waterproof paint on undiagnosed humidity can hide the problem for a while, but not solve it. If the source is still active, the stain may reappear, the finish may come off, or the wall may deteriorate.
From a more natural and home-compatible approach, it is advisable to consider mineral paints, lime paints or breathable finishes when the substrate allows it and when the moisture does not come from a leak or active filtration.
In summary
Plastic or waterproof paints can be useful in certain uses, but they should not be applied as an automatic solution against moisture. If the wall needs to dry or breathe, a layer that is too closed can aggravate the problem.
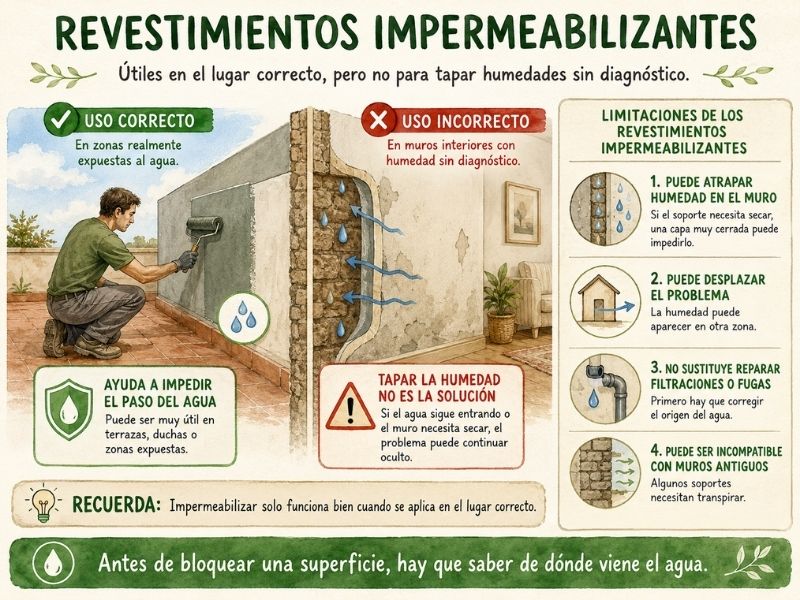
Waterproofing coatings are used to prevent the passage of water in specific areas of the house or building. They may be necessary on roofs, terraces, showers, buried walls, basements or points where there is direct contact with water.
Their main advantage is that they help create a barrier against water. When applied in the right place and within a well-designed system, they can be an effective solution to prevent leaks or protect exposed areas.
The problem arises when they are used as an automatic response to any indoor moisture stain. If there is a leak from the outside, an active leak or moisture coming from the ground, applying a waterproofing coating on the inside can hide the problem without solving it.
In some cases, it can even displace moisture to another area or leave it trapped inside the wall. This can lead to detachment, new stains, salt build-up or deterioration of the support.
Special care must also be taken with old walls or traditional materials, which often need to breathe and dry naturally. If they are blocked with coatings that are too tight, their hygrothermal balance can be disturbed.
From a more prudent approach, waterproofing coatings should be used when they are really needed and always after identifying the source of the water. It is not a matter of waterproofing by system, but of applying the right solution at the right point.
In summary
Waterproofing coatings can be very useful in areas exposed to water, but they should not be used to cover up undiagnosed moisture. Before blocking a surface, you need to know where the water is coming from and how the support needs to behave.
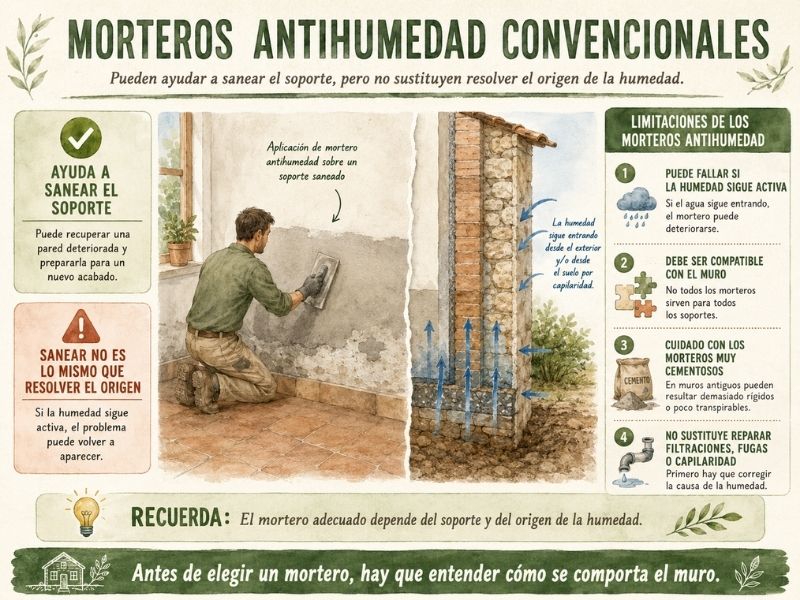
Conventional anti-humidity mortars are commonly used to remediate walls affected by moisture, salts or deterioration of the coating. They are usually applied after removing damaged paints, plasters or mortars, especially in low areas of walls or walls with chips.
Their main advantage is that they can help recover a degraded support and prepare the wall to receive a new finish. Some mortars are formulated to better resist the presence of salts or to promote some evaporation of moisture.
However, not all anti-humidity mortars work the same. Some may be too closed, rigid or incompatible with certain supports, especially in old walls of stone, brick, rammed earth, adobe or traditional mortars.
The main risk appears when they are applied without resolving the origin of the moisture. If water continues to enter through capillarity, filtration or leakage, the mortar can end up deteriorating, detaching or moving the problem to another area.
It is also advisable to be careful with very cementitious mortars in rehabilitation. In some old walls they may be not very compatible, make it difficult for the support to breathe or generate tensions with softer and more traditional materials.
From a more building-friendly approach, the choice of mortar should depend on the type of wall, the origin of the moisture, the presence of salts and the need for breathability. In many cases, lime mortars can be a more compatible alternative, especially in rehabilitation and traditional mineral supports.
In summary
Anti-humidity mortars can help to clean deteriorated walls, but they should not be applied as a universal solution. Before choosing a mortar, you must identify the source of the moisture, assess the type of support and choose a system compatible with the wall.
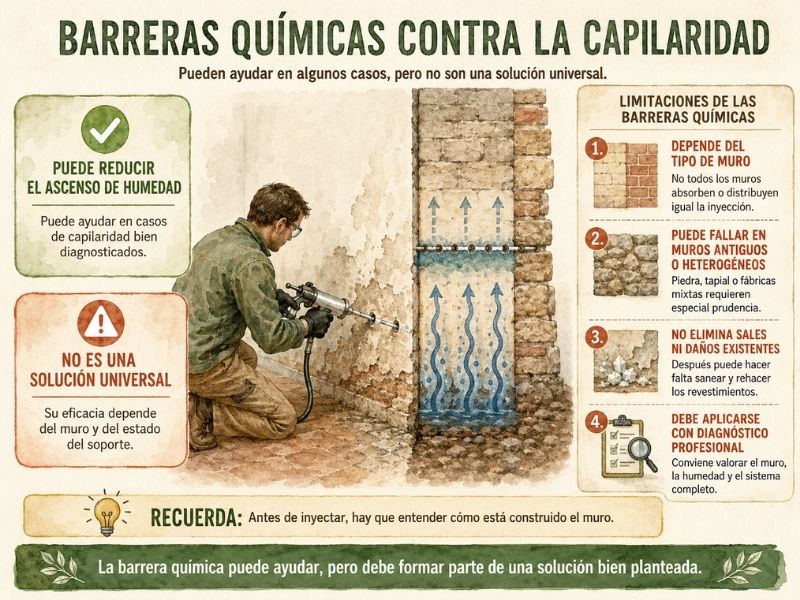
Chemical barriers against capillarity are a solution used to reduce or interrupt the rise of moisture from the ground through walls.
They are usually given by injections at the base of the wall. The aim is to create an area within the wall that makes it difficult for water to pass upwards, acting as a kind of barrier against rising humidity.
Their main advantage is that they can be useful in certain cases of rising damp, especially when the problem is well diagnosed and the wall allows for proper application.
However, they are not a universal solution. Its effectiveness depends on many factors: the type of wall, its thickness, the materials that compose it, the level of humidity, the presence of salts and the general condition of the support.
In old walls, made of stone, solid brick, rammed earth or mixed compositions, you have to be especially careful. These walls are not always homogeneous and the barrier may not be evenly distributed. In addition, if there are accumulated salts or incompatible coatings, it may be necessary to combine the intervention with adequate sanitation and breathable mortars.
It’s also important to remember that a chemical barrier alone doesn’t repair existing wall damage. If the coating is deteriorated, if there is saltpeter or if the substrate has lost consistency, it will be necessary to clean up and choose a compatible system after treating the source.
From a more respectful rehabilitation approach, this type of solution should always be valued within a complete diagnosis, not as an automatic response to any low stain on a wall.
In summary
Chemical barriers can help reduce rising damp, but they must be applied with professional judgment. Their effectiveness depends on the type of wall and, in many cases, they must be accompanied by sanitation, drying and compatible finishes.
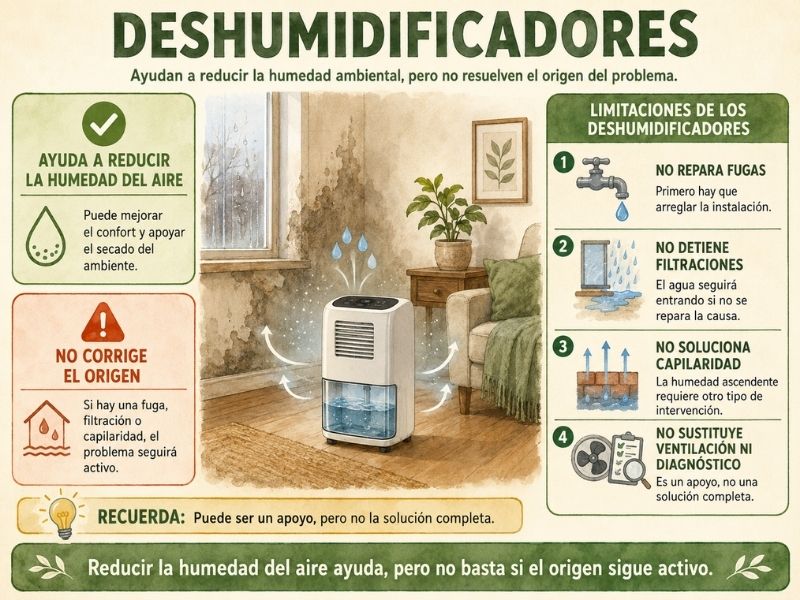
Dehumidifiers are devices that reduce the amount of moisture present in the indoor air. They work by extracting part of the water vapour from the environment and accumulating it in a tank or evacuating it through a drain.
Their main advantage is that they can help improve comfort in rooms with a lot of humidity. They can also be useful as a support in drying processes, for example after a leak or a leak that has already been repaired.
In homes with poorly ventilated bathrooms, laundry rooms, basements, cold rooms, or areas where laundry is hung indoors, a dehumidifier can reduce the feeling of a stuffy environment and help control surface condensation.
However, a dehumidifier alone does not solve the source of damp. If there is a leak, active filtration, rising damp or a very cold wall with a thermal bridge, the appliance can collect water from the environment, but it will not correct the real cause.
It can also generate a false sense of solution. The room appears drier, but the wall may remain wet, the leak may continue, or the problem may reappear when the appliance is turned off.
From a more comprehensive approach, the dehumidifier can be a one-off aid, but it should not replace ventilation, source diagnosis or the choice of suitable materials.
In summary
Dehumidifiers can help reduce ambient humidity and improve comfort, but they do not solve leaks, leaks, capillarity or construction problems. They are a support, not a complete solution against moisture.
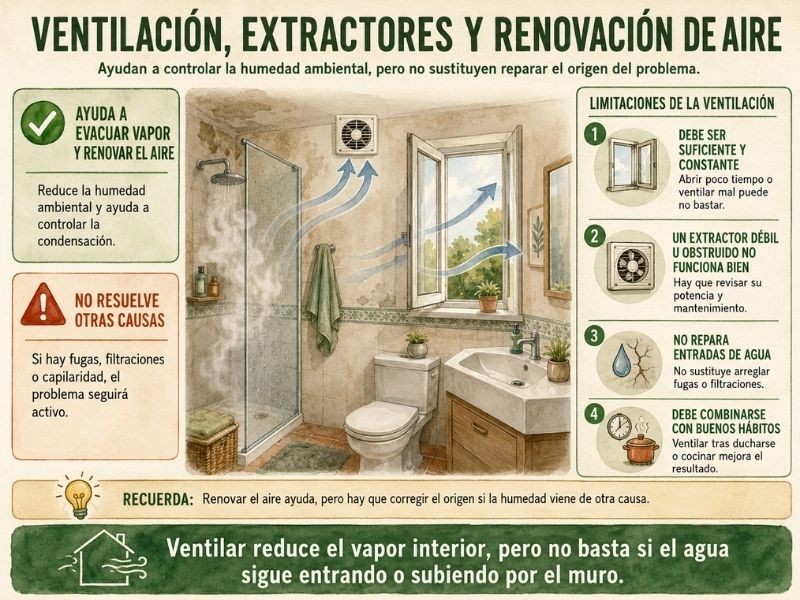
Ventilation is one of the most important measures to control indoor humidity, especially in cases of condensation, bathrooms with mold, kitchens, laundry rooms and homes where steam accumulates easily.
Ventilating allows you to renew the indoor air, evacuate part of the water vapour and reduce the feeling of a charged environment. In bathrooms and kitchens, where a lot of humidity is generated in a short time, exhaust fans can be especially useful when there is not enough natural ventilation.
Its main advantage is that it acts on one of the most frequent causes of condensation damp: excess steam in the environment. Good air renewal helps surfaces dry better and reduces conditions that favor mold growth.
However, ventilation doesn’t solve everything either. If there is a leak, active filtration, or rising damp, venting may help dry, but it will not eliminate the source of the water.
It is also important that ventilation is adequate. Opening a window for a few seconds may not be enough in very humid rooms, and a poorly installed, clogged or low-powered exhaust fan may not renew the air effectively.
From a healthy approach, ventilation should be understood as part of the balance of the home. It helps control indoor steam, improves air quality, and can reduce the risk of mold, but it must be combined with suitable materials, good habits, and correct diagnosis when humidity is persistent.
In summary
Ventilation and exhaust fans are essential to control ambient humidity and reduce condensation, but they are not a substitute for repairing leaks, leaks or capillary problems. They are an important part of the solution, not always the complete solution.
After identifying the main types of humidity and reviewing the most common solutions, in this block we are going to focus on RedVerde’s approach and the materials that can help improve the behavior of the home.
Below, we will look at different solutions based on mineral, breathable and natural materials, such as lime paints, silicate paints, clay coatings and lime mortars.
In each section we will indicate when they can be useful, what role they can play within a well-planned intervention and which RedVerde products or categories can help in each case.
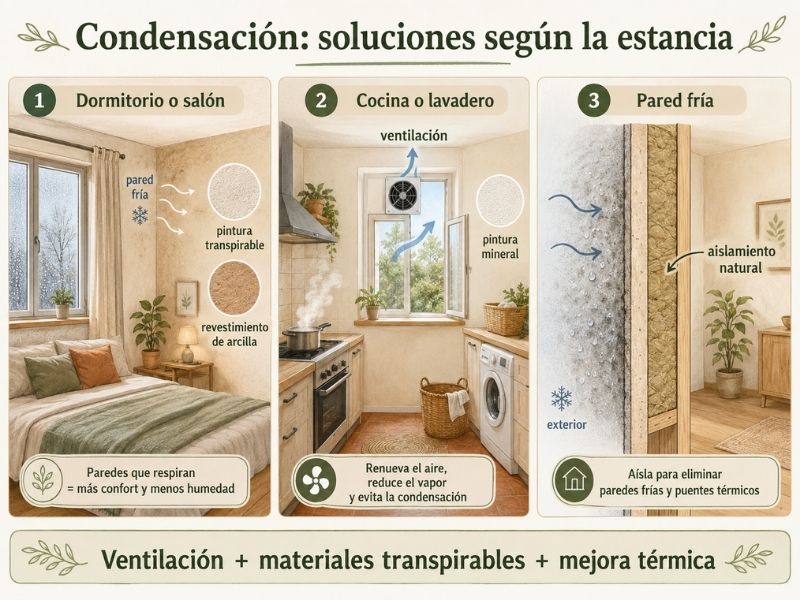
Condensation damp occurs when water vapour from the indoor environment comes into contact with cold surfaces and turns into water droplets. It is common in windows, corners, bedrooms, bathrooms, kitchens and exterior walls with poor ventilation or low thermal comfort.
In these cases, the solution does not usually depend on a single product. The most important thing is to reduce excess steam, improve air renewal and avoid surfaces that are too cold. Once these conditions have been controlled, the choice of breathable and compatible materials can help to improve the performance of the space.
Condensation in bedrooms, living rooms and interior rooms.
When condensation appears in bedrooms, living rooms or rest areas, it is usually related to cold walls, poor ventilation or excess ambient humidity.
In these cases, solutions such as:
Clay coatings can be especially interesting in interior spaces where the aim is to improve comfort, create warmer environments and promote a natural regulation of ambient humidity.
Condensation in kitchens and laundry rooms.
Steam is generated on a regular basis in kitchens and laundry rooms. Cooking, scrubbing, washing, or hanging clothes indoors can greatly increase ambient humidity.
Here it is advisable to combine good ventilation habits with suitable finishes. On walls and ceilings that are not in direct contact with water, silicate paints, lime paints or clay paints can be assessed, always on dry, firm and correctly prepared substrates.
If it is an area that is highly exposed to stains, grease or direct water, it will be necessary to choose the finish more carefully and differentiate between a surface that needs to breathe and a surface that needs greater resistance to daily use.
On cold walls or with thermal bridges
When condensation is always concentrated on the same wall, corner or construction encounter, there may be a cold surface or a thermal bridge.
In these cases, paint alone is usually not enough. It may be necessary to study an improvement in the thermal behaviour of the house through appropriate construction solutions.
Natural insulations, such as wood fiber, cork, cellulose, or other compatible systems, can help improve indoor comfort and reduce cold surfaces where condensation occurs, provided they are designed and executed correctly.
In these cases, solutions such as:
In summary
Against moisture due to condensation, RedVerde can provide natural and breathable solutions such as mineral paints, lime paints, clay paints, clay coatings and natural insulations.
These solutions must always be accompanied by good ventilation, control of the interior steam and assessment of the support. If the condensation is due to cold walls or thermal bridges, it may be necessary to study a more complete construction solution.
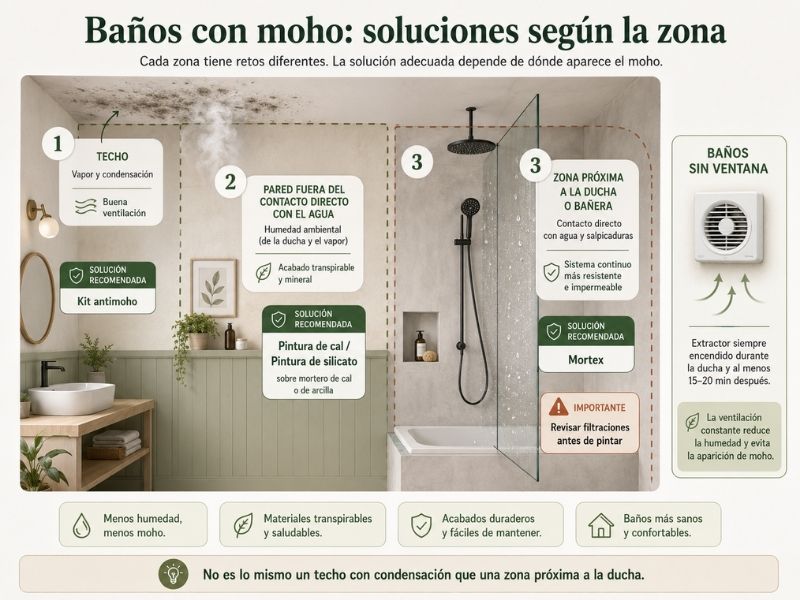
Mold in bathrooms usually appears due to steam buildup, lack of ventilation, and cold surfaces where moisture condenses easily. Although it is often related to condensation, it is also advisable to rule out leaks in joints, shower trays, bathtubs, screens or installations.
In bathrooms, not all areas have the same needs. A ceiling affected by steam is not the same as a wall outside direct contact with water, an area near the shower or a surface that receives water on a regular basis. Therefore, the solution should be chosen according to where the mold appears and the level of exposure to water.
Moldy bathroom ceilings
On ceilings where mold appears due to condensation, the first thing to do is to improve ventilation and clean the surface properly. If the bathroom remains closed after each shower or the exhaust fan does not work properly, steam will continue to build up and the problem may return.
For this type of case, at RedVerde we recommend evaluating the anti-mould kit, especially designed as a solution for surfaces affected by mould in humid environments.
Recommended product:
Before applying any product, the support must be clean, dry and properly prepared. If mold reappears frequently, it is advisable to check the ventilation and rule out a leak or leak.
Walls out of direct contact with water
On bathroom walls that receive steam but not direct water, mineral and breathable finishes, such as silicate paints or lime paints, can be considered.
This is common in bathrooms tiled up to half height or in bathrooms without tiling, where the upper part of the wall or ceiling is finished with paint. For the system to work properly, it is recommended that the substrate is also compatible, for example a lime mortar or a clay mortar.
In this type of surfaces, RedVerde can offer solutions such as:
These solutions can be interesting when looking for a mineral, breathable finish that is more compatible with traditional supports. Even so, they should always be applied on healthy, dry and well-prepared surfaces.
Areas near the shower or bathtub
In areas near the shower, you should be more cautious. If mold appears near a screen, a joint, a shower tray or a bathtub, it is first advisable to check that there is no leak.
In these areas, it is not enough to choose a breathable paint. If there is frequent contact with water, splashes or risk of leakage, it is important to assess a robust, continuous and well-executed system.
A solution that can be considered in these cases is Mortex, especially when looking for a continuous, decorative and resistant finish in wet areas, always with a correct preparation of the substrate and a professional application.
Recommended Solution:
The key is to differentiate the areas exposed to steam from the areas exposed to direct water. Not all of them require the same system or the same type of finish.
Bathrooms without windows or with poor ventilation
In bathrooms without a window, the extractor fan is essential. It should have enough power, be clean, and run the necessary time after showering.
In these cases, RedVerde can provide healthier and more compatible finishing solutions, but ventilation will continue to be an essential part of the intervention. A good finish does not compensate for a bathroom that does not renew the air properly.
In summary
To treat mold in bathrooms, you must first check the ventilation, clean and sanitize the support, rule out leaks and choose the right finish according to the area.
On mouldy ceilings, the anti-mould kit can be considered. Mineral paints, lime paints or silicate paints can be used on compatible substrates on walls that are not in direct contact with water. In areas close to the shower or with greater exposure to water, it is advisable to study resistant and well-executed systems such as Mortex.
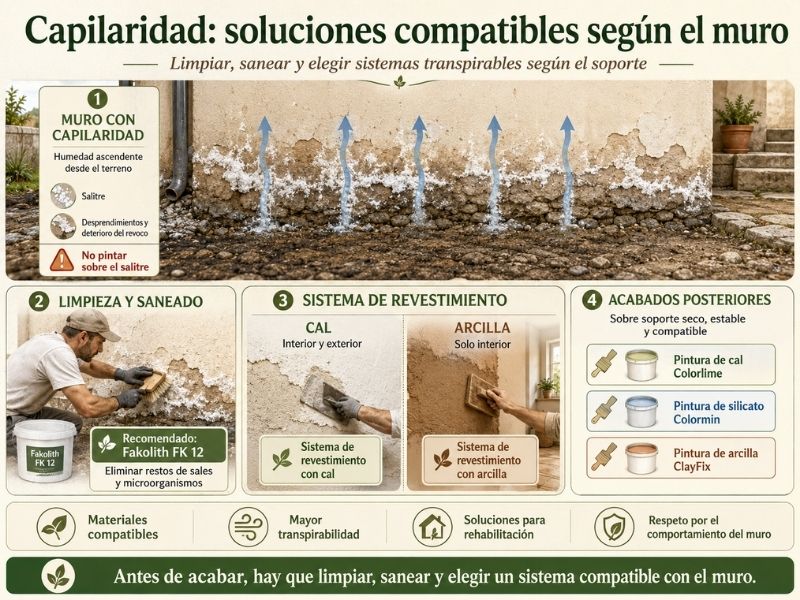
Rising damp occurs when water from the ground rises through the pores of the wall and mainly affects the lower part of the walls. It is common on ground floors, old walls, homes in contact with the ground or constructions without an effective barrier against rising humidity.
In these cases, RedVerde can provide compatible materials for the sanitation, coating and finishing phase, but it is important to be cautious: capillarity must be correctly assessed before applying any system.
Old or refurbishment walls
In old walls made of stone, brick, rammed earth or traditional mortars, it is not advisable to apply materials that are too closed or rigid without first studying the support.
In this type of intervention, lime coating systems can be a very interesting option, both indoors and outdoors. Lime is a mineral material, compatible with many traditional supports and suitable for solutions where breathability and respect for the behavior of the wall are sought.
Recommended system:
Indoors, clay coatings can also be valued, especially when seeking to improve comfort, the natural regulation of ambient humidity and the quality of the indoor environment. It is important to note that clay coatings are suitable for interiors, not for outdoor areas exposed to the elements.
Recommended system:
The choice between lime or clay will depend on the type of wall, the room, the degree of exposure, the desired finish and the behaviour sought in the support.
Walls with saltpeter or deteriorated coatings
When saltpeter, chips or paint that peels off the lower part of the wall appears, the first thing to do is to remove the deteriorated materials and assess the real state of the support.
Before applying a new coating system, it is important to make sure that all traces of salts, dirt and microorganisms present on the surface are removed. For this cleaning and preparation phase, it may be advisable to use a specific cleaner such as Fakolith FK 12.
Recommended product:
It is not advisable to paint directly on top of the saltpeter or cover the area with a plastic paint or waterproof coating. If moisture is still active inside the wall, the problem can reappear and deteriorate the finish again.
Once the materials in poor condition have been removed, the support has been cleaned and the origin of the moisture has been assessed, mortars or coatings compatible with the wall can be applied.
Rear finishes
After remediation and once the substrate is dry, stable and correctly prepared, mineral and breathable finishes can be assessed.
On compatible substrates, lime paints and silicate paints can be a good option for maintaining a surface that is more open to steam than a conventional plastic paint.
Recommended Products:
In interiors with clay systems, a clay paint can also be considered as a final finish, especially when looking for a natural, breathable and consistent solution with the applied system.
Recommended product:
These finishes can help to complete a system more compatible with the wall, but they should not be used to hide active moisture without prior treatment.
In which areas of the house it is usually applied
This type of solution is usually valued in:
In summary
In damp by capillarity, RedVerde can provide mineral and compatible solutions such as lime coating systems, interior clay coatings, lime paints, silicate paints and clay paints.
Before applying any finish, it is necessary to remove deteriorated materials, clean the support properly, remove traces of salts and microorganisms, assess the wall and choose a system compatible with its behaviour.
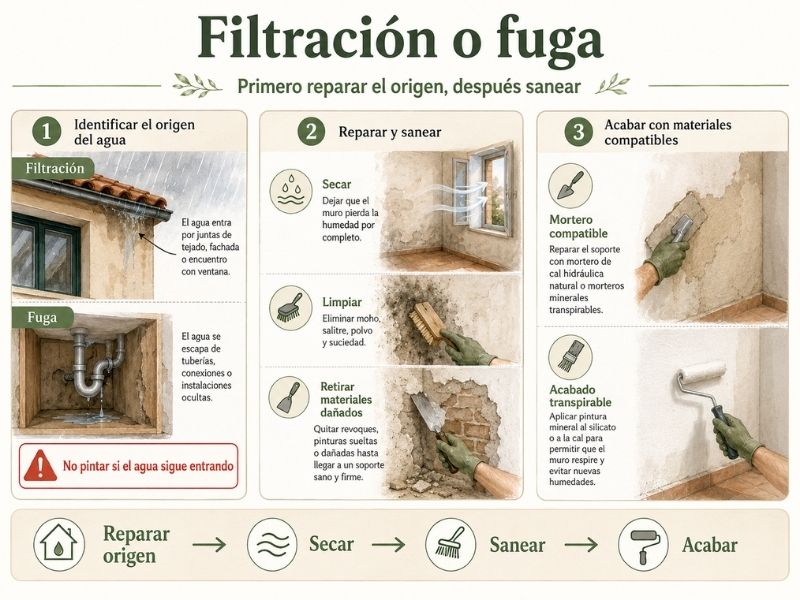
Moisture by filtration appears when water enters from the outside through a roof, terrace, façade, window, deteriorated joint or wall in contact with the ground. Leakage damp, on the other hand, comes from an installation: pipes, drains, downpipes, heating, shower, washbasin or sink.
Although the origin is different, the way it works has something in common: before applying any product, the water ingress or fault must be located and repaired. If water keeps getting in, any paint, mortar, or interior coating will only be a temporary fix.
First: Repair the source of the water
In a filtration, the priority will be to act on the point where the water enters: roof, terrace, façade, carpentry, joint or construction joint. In the event of a leak, the affected installation will need to be repaired before any intervention can be carried out on the wall, ceiling or floor.
RedVerde can provide solutions for the subsequent phase of sanitation and finishing, but it is not advisable to coat or paint if the water ingress is still active.
Allow to dry and remove deteriorated materials
Once the origin is resolved, the support must dry properly. Depending on the type of wall, the thickness, the material and the time it has been exposed to water, this process may take more or less time.
It may also be necessary to remove damaged materials:
Applying a new finish on a surface that is still wet or degraded can cause stains, chips, or lack of stick.
Sanitize and prepare the support
Before recomposing the wall, it is advisable to clean and sanitize the surface properly. If traces of mold, dirt, organic stains or microorganisms have appeared, it may be advisable to use a specific cleaner before applying new materials.
Recommended product:
This phase is important for the support to be prepared and the subsequent system to perform better.
Repair with compatible materials
When the substrate is already dry, clean and stable, repair with compatible mortars can be considered. In mineral walls, rehabilitation or traditional supports, lime mortars can be an interesting option due to their compatibility and breathability.
Recommended Products:
The choice will depend on the condition of the substrate, the thickness required, the affected area and the final finish planned.
Rear finishes
Once the substrate has been repaired, mineral and breathable finishes can be applied, as long as the surface is dry and properly prepared.
Indoors, lime paints, silicate paints or clay paints can be considered, depending on the type of support and the room.
Recommended Products:
In summary
In the case of damp due to filtration or leakage, the first thing is always to repair the source of the water. Then it will be necessary to dry, remove deteriorated materials, clean the support and recompose it with compatible materials.
RedVerde can provide solutions for the subsequent phase: cleaning, sanitation, lime mortars, mineral coatings and breathable finishes appropriate to the type of support and the affected room.
1. What is the best solution for moisture in a wall?
There is no single solution for all dampness. The best solution depends on the source of the problem: condensation, capillarity, filtration, leakage, or lack of ventilation. Before applying paint, mortar, or coating, it is important to identify the cause and act on it.
2. How do you know if a damp is due to condensation or filtration?
Condensation damp usually appears in cold corners, windows, bathroom ceilings, bedrooms or areas with poor ventilation. It usually gets worse in the winter or after showering, cooking, or hanging clothes indoors.
Humidity due to filtration is usually related to the entry of water from the outside: roof, terrace, façade, window, joint or wall in contact with the ground. It can appear after rains or in specific areas where water finds an entry point.
3. How do you know if a wall has rising damp?
Rising damp usually appears in the lower part of the walls, near the floor or the skirting board. It is usually accompanied by saltpeter, chipping, raised paint or deterioration of the coating. It is common on ground floors, old walls or houses in contact with the ground.
4. Can I paint on top of a wall with moisture?
It is not recommended to paint directly on top of a wall with moisture. If the source of the water is still active or the substrate is not dry and healthy, the paint may flake off, stain or deteriorate again. First you have to identify the cause, repair the source if there is water ingress, let it dry and prepare the substrate correctly.
5. Does anti-mold paint eliminate the moisture problem?
Anti-mold paint can help protect the surface from mold growth, especially in bathrooms, kitchens, or areas with ambient humidity. However, it does not by itself eliminate the cause of the problem. If condensation, lack of ventilation, a leak, or a leak remains, mold can return.
6. What to do if mold appears on the bathroom ceiling?
In bathroom ceilings with mold, the first thing is to improve ventilation, clean and sanitize the surface, and check that there is no leak or leak. Once the substrate is dry and prepared, an anti-mould treatment suitable for this type of environment can be assessed.
7. Which paint is best for wet bathrooms?
In bathing areas that receive steam but not direct water, mineral paints, lime paints or silicate paints can be considered, provided that the substrate is compatible and correctly prepared. In areas with direct contact with water, such as showers or surfaces exposed to frequent splashes, it is advisable to study more resistant and well-executed systems.
8. What to do with a saltpeter wall?
When saltpeter appears, the first thing is not to cover it with paint. Deteriorated coatings must be removed, the surface cleaned, traces of salts and microorganisms removed, the origin of humidity must be assessed and a system compatible with the wall must be applied. On older walls, lime mortars and breathable finishes can be a suitable option.
9. What materials are recommended for old walls with moisture?
In old walls, it is advisable to avoid solutions that are too closed or rigid if the support needs to breathe. Lime coating systems can be used indoors and outdoors, while clay coatings are recommended only indoors. The choice will depend on the type of wall, the existing humidity, the condition of the support and the desired finish.
10. Does a dehumidifier solve the humidity of a home?
A dehumidifier can help reduce ambient humidity and improve indoor comfort, but it does not solve construction problems such as capillarity, leaks or leaks. It is useful as a support, but it does not replace a diagnosis or the repair of the source of the problem.
11. When should I consult a professional for dampness?
It is advisable to consult a professional when humidity reappears, increases over time, affects several areas, appears after rain, is accompanied by saltpeter, there is persistent mold or a leak or leak is suspected. It is also advisable to ask for advice before working on old walls or delicate supports.
12. Can RedVerde help me choose a solution for humidity?
Yes. RedVerde can help you assess what type of materials may be most suitable according to the origin of the moisture, the substrate and the room: mineral paints, lime paints, silicate paints, clay paints, lime mortars, clay coatings, anti-mould treatments or compatible systems for rehabilitation. Even so, if there is an active ingress of water or a breakdown, it will first need to be repaired.
Each home and each humidity requires a specific assessment. If you have doubts about which product to use, what support you have or which system may be most suitable, you can consult RedVerde to receive advice and find a solution consistent with the origin of the problem, the type of wall and the use of the room.